Chuck’s Quilt
October 16, 2002
 The USPS performed as advertised, so now I’m free to tell the story of this small quilt, the one I was being mysterious about in my last entry lest I ruin the surprise for the recipient. I made it for Chuck, one of my online friends from an Artist’s Way mailing list. He made a CD of songs he wrote, performed, and recorded, and I promised him a quilt block suitable for framing or making a pillow cover from in trade for getting a copy of his CD. After listening to it several times, I decided to do something inspired by my favorite track on the CD, “The Dragon’s Nightclub”. The song is undulating and mysterious, and I could just see the fabrics I wanted to use whenever I listened to it—smoky blacks and browns with sinuous patterns. I wasn’t sure a single quilt block was going to be enough, though. I remembered a pattern I was pretty sure I’d saved of a small quilt with blocks arranged in vertical bars; this seemed like a perfect opportunity to use it, and it would also give me a chance to try quarter-circle piecing (also known as Drunkard’s Path blocks).
I found the pattern in my files (which was the second time in two tries that I was able to locate what I wanted in there, so maybe I’m not as disorganized as I feel most of the time). I went through my fabric stash, first pulling a print with dragons and twining vines on a black background and then choosing a whole bunch more prints to go with it. I dragged everything downstairs to start cutting and playing and almost immediately departed from both the pattern and my idea to focus on one song. Sometimes the project just has a mind of its own, and this was one of those cases.
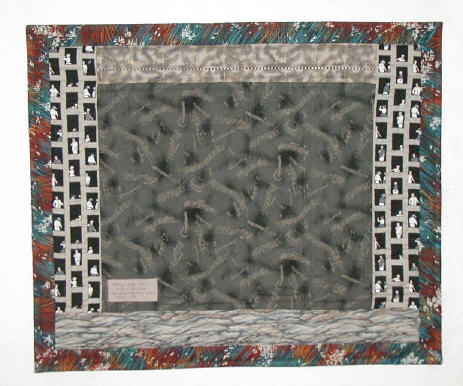
I did keep some elements of the pattern– the vertical bars, the narrow sashing between them, some Drunkard’s Path blocks—but the rest of the structure arose out of playing with the fabrics and listening to the CD and studying the booklet Chuck had made to go with it. I ended up with one vertical bar for each of the six songs, alternating bars cut from a single print with ones pieced from several. I decided on the width and height of the bars based on the size of the piece of dragon fabric I had and how big the dragon motif was as well as how big the Drunkard’s Path templates I had were, which meant that the plain bars are wider than the pieced, plus the pieced bars get more complex as they move from left to right on the quilt, adding even more visual interest.
I started laying out the bars first, putting them in same order on my felt wall as the tracks on the CD. First up was “Miracle”, which Chuck illustrated in his booklet with pictures of and from space. The first fabric I chose for this bar was planets on a dark sky. I cut three squares from this, with a small blue planet in the first, a slightly larger one in the second, and a big one in the last, the big blue ball of Earth. I found two navy blue prints that coordinated with the space theme and interspersed those between the planets. One was a mysterious face—the sun? the moon? a divine being?– and the other was random swirls of the cosmos.
The next bar, for “She’s Cool”, is a single fabric. It shows people silhouetted in windows, suggesting a high rise apartment building. Surely one of those people is a cool woman, all laid back attitude clothed in a stylin’ outfit. The other people might not even be aware of the coolness in their midst; their faces have no features to give any clues.
“Farewell, Be Well” comes next. The song says “travel” to me, and travel often means a plane, so I started with a fabric that reminded me of fields viewed from the air, brown and green and burgundy rectangles separated by lighter strips that could be roads or fences or walls. I then cut quarter circles from a brown and tan print: the front of a car, part of a map, several views of roads, a bridge, a city skyline. I only needed five of these pictures, but it took a little experimenting to find which ones would work best.
For “Sea Voyage”, I chose a swoopy print with a grid pattern superimposed on it that reminded me of rigging. I have plenty of fabrics that clearly show waves and even boats, but I like the non-literalness of this print, which suggests the motion of the sea without shouting “water”. It leaves something to the imagination, like listening to music does (or did, in the days before MTV).
The last pieced bar was “Graduation Day”; Flying Geese blocks would be perfect, as graduation is a traditional time for kids to fly away. I wanted to include a taste of school days as well as the idea of moving on to the bright lights of the big city. After some playing around with different fabrics and ideas, I ended up with a progression from bottom to top representing the path from early school days to after graduation. At the bottom of the bar, there’s a print with childish drawings and lettering, and at the top there’s a glittering city skyline. In between, there are several transition prints, including one that looks like penmanship exercises—black letters on a cream background, complete with the solid and dotted lines like the tablets I learned to write on (do kids still do this?) and arrows indicated which way the strokes in the letters should be formed.
The final bar is “Dragon’s Nightclub”, which is simply cut from the first fabric I chose for the quilt, the dragons and vines on a black background. At this point, I was pretty happy with how the bars looked. I was a little concerned about the odd dimensions the design was taking on—far wider than it was tall, which seemed like it might be rather awkward-looking. I figured I would just move forward and trust that I’d figure out how to make it work and end up with a finished size that was pleasing to the eye.
I decided to sew the bars together before I working on the sashing and borders because it would be easier to move the bars around and try things out on the felt wall if I only had six units to deal with instead of all the little pieces. All was well until I got to the “Farewell, Be Well” bar. I pulled out one of my books on Drunkard’s Path quilts (Happy Trails by Pepper Cory) and followed the directions, carefully marking dots on both pieces so I could match them with pins before sewing. I used many pins and sewed slowly, but ended up with a block that was not only not square but also had a tuck sewn into the seam. Not what I intended, obviously. I ripped it out and tried again, and this time I got TWO tucks in the seam. Bleah. I got another book out (Drunkard’s Path by Anita Murphy) and followed those directions instead. That worked much better, and was faster, too, since I didn’t have to do so much marking and pinning. Still, I’m thinking I won’t be making a Drunkard’s Path quilt any time soon.
Okay, bars assembled, on to the sashing. I’d pulled a bunch of golden yellows for this to pick up an accent color in the original dragon fabric. I thought that color would still work even though I’d introduced a lot of other fabrics since abandoning the all dragon all the time theme I started with. Most of the bars had some warm tones in them, and yellow is a strong and light color that wouldn’t blend into the bars and so would frame them nicely. I smoothed my favorite of the yellow prints, one with a touch of grey that would echo the quieter tones in some of the bars, up onto the felt wall and placed the bars on top to see how it would look, lining them up evenly top and bottom and leaving about an inch of the yellow showing through in between. Almost at once, the bars demanded to be offset, with the narrower pieced ones sliding up about an inch. I had no plan to do a staggered layout, but that seemed to be what was called for. Then some of the bars demanded a different sashing fabric; the bars vary in value, so it makes sense that the sashing would, too, to maintain a similar contrast between bar and sashing across the piece. By the time I was done laying it all out, I had strips cut from four different yellows, and sashing along only two sides of each bar. Not what I’d planned, but this looked better than the plan.
The border fabric I wanted to use did not look right snugged up against the bars and sashing, so I needed to insert a narrow spacer border. I settled on a tomato soup red fabric with swirls of black dots. That gave the bars enough breathing room that the border print didn’t overwhelm them. I decided to put the final border on just the top and the bottom rather than all the way around as is typical; it just looked better that way. Sewing the sashing and borders went pretty smoothly, even though the sashing demanded to be mitered (I’m not usually one for doing even slightly complicated piecing, preferring to spend most of my quilting energy on design, not construction). The one mishap was sewing a strip on upside down, which was yet another reminder that my personal rule of “no sewing after 9 o’clock” exists for a reason.
 Once the top was finished, I did the backing. Most of my quilts have a single fabric for the backing, but when I’d pulled the fabrics for this one, a group of prints sort of leapt out of my stash and demanded to be used together in the backing. It came together pretty much like I envisioned it the first day I worked on this project, with just one fabric substitution. Once the backing was pieced, I carefully laid out the layers and basted them with safety pins, hoping I was getting the seams on the back lined up properly in relation to the seams on the front. When I started quilting, I was happy to find I’d succeeded. I was not happy with how much shifting the layers were doing as I quilted, even with all the pins I put in and using a walking foot for the straight lines. I’d used fusible batting for the two or three projects before this one, and I missed it. With the fusible, the three layers are stuck together evenly and securely. It’s definitely worth the extra money. I’ll have to get back on the JoAnn Fabrics mailing list so I get their coupons and know when it goes on sale so I can stock up. I was so unhappy with the shifting layers that I considered picking out all the quilting and starting over with fusible batting, but that would take such a long time, and Chuck had already been waiting months. I could only hope that he won’t notice the problems as much as I did—I am my own worst critic a lot of the time.
I was hoping to make the sleeve as part of the binding; a small piece like this doesn’t need a big rod to hang it. I know I’d read about a way to do that and thought I’d saved an article explaining how but could not find it in my files (so much for feeling organized because I found the pattern). My guess is that it’s in one of the boxes of unfiled clippings. Someday I’ll have to go through those, but that’s too daunting a thought right now. Thanks to the magic of the Internet, I found the directions online and did the binding that way. It worked pretty well, though it covers up more of the back of the quilt and requires one extra sewing step than the other binding methods I use. Once the binding was done, I completed the label and sewed it on and finally the piece was ready to get shipped out. As always, there were things I felt I could have done better from a construction standpoint, but overall I was happy with it.
This was a fun piece to work on. I tried some things I hadn’t before, like the Drunkard’s Path blocks and not having the final border frame the piece on all four sides. I enjoyed letting the music guide my fabric choices. Usually, it’s just me and the voices in my head, but this time, I let someone else’s voice in there through his music. I like how it turned out, and I’m happy to report that Chuck likes the finished piece, too.
Reminder: I have a glossary in which I expound on some of the quilting terms sprinkled through this entry. If you find additions that need to be made, e-mail me.
Addendum, 24-Oct-2002: After reading this entry, Chuck e-mailed me with a minor correction: he doesn’t just like his quilt, he’s delighted with it and thinks it’s great! I blush. Another comment he made caused me to reflect on how much I condensed the story of making this quilt. I didn’t do a good job of communicating the pace of my work, the way the process of making this quilt stretched into months as I experimented with different fabrics and left them up on the felt wall for days or weeks until the combinations satisfied me. I usually spend a lot more time thinking than I do sewing, but when I’m done, it’s hard to remember all the things I contemplated. Maybe I need to start a daily quilting update so I can keep track.