Hat on Top, Coat Below
« previous archives home notify list e-mail next »
Delphine’s Quilt
June 11, 2003
 Here’s the quilt I mentioned briefly yesterday. It is not the project that was next on my list after the last baby quilt. I thought I’d start on the memory quilt after the mystery quilt party. Before Erica and I even had our cutting day for that, though, the opportunity to go to Toronto came up. In addition to having Isabelle and Maya become Internet people made flesh, I’d get to meet Delphine before she was even a month old, which got me thinking “baby quilt”. I didn’t even have to really bend the rules to get started, since I figured this situation met the spirit of the second rule. While I’m hesitant to call someone a friend if I only know them through words on a screen, I’d met Amy and Blake in person and communicate with them as often as I do with most of my offline friends.
Once I decided Delphine needed a quilt, I got moving, because I needed to get it done before I went to visit; it would be just plain silly to go and then a few weeks later ship a box over. (New readers might want to open the glossary in a new window now, as the quilting terms are going to really start flying soon.) In the May box o’ clippings (which, by the way, I managed to finish sorting and filing about eight hours before the month ended), I’d come across another pattern from the Fons & Porter magazine that I wanted to try. Of course, I had to change a few things to make it the size I wanted; once I’d finished playing on EQ with it, the sashing was bigger and the borders smaller and all the sashing intersections had stars in them, even the ones that were next to the border.
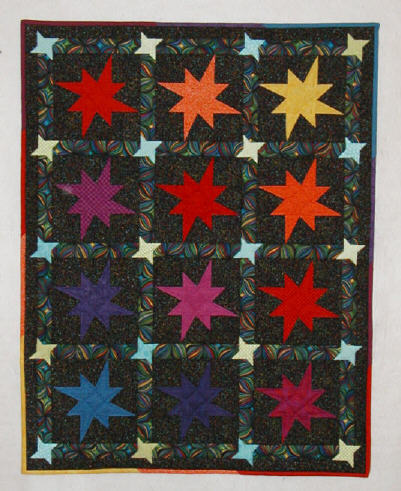
I wanted a color scheme with a lot of black in it not because I was planning an homage to the Amish, but because I remembered reading an entry Amy wrote for the pregnancy journal about shopping for things for the baby and finding a wealth of green and blue but no black or grey or red. Besides, Delphine could very well grow up to be an urban hipster, so why not get her started on black at a young age? I briefly considered doing a black, white, grey, and red quilt, but that seemed too grown up, especially the grey part, and putting white next to black is just inviting the white to get dirty. (The baby quilt with cranes, with its ivory and black triangles, was one of the first ones I made, and I got a chance to see it about four years later, after many washings. Some of the black patches had bled into the light ones, even though all the fabrics had been prewashed. I was glad the quilt had been loved and used, and that the stitching had held up, but disappointed about the dye transfer). So, no grey and no white. That left black and red, so using that as a starting point I went to my stash to see what I had in the way of suitable fabrics. I found two pieces big enough to make a backing with some left over for the front: a plaid and a dot, both with black backgrounds and a variety of brights in the motifs. The dot seemed like more fun, so I went with that. I pulled colors for the stars based on the colors of the dots: yellow, orange, red, red violet, purple, and blue for the blocks and turquoise and lime for the sashing intersections.
I was on a roll, ready to get to the cutting and sewing. It was going well until I got to the long star points. The pattern called for a rectangle of the star fabric to be placed over the background fabric and sewn on the diagonal before the having the excess trimmed off. It seemed straightforward enough; doing something similar for the short star points had worked just fine. But those had been squares of star fabric, placed flush against two sides of the background patch. Easy peasy. These new points were rectangles, not placed flush against anything, and the directions in words did not match the diagram intended to explain them. I tried it one way, only to find when I opened it up I had only half a star point, and a crooked one at that. I tried it another way with a slightly different but equally unacceptable result. I grabbed the seam ripper and unsewed and read the directions again and studied the diagram and tried a few more times. Nope, still not working. I considered cutting all new pieces for these points, extra extra large so I’d have plenty of room for error, but I really didn’t want to waste the fabric I’d already cut. I also didn’t want to this pattern to beat me. I decided to try printing templates from EQ so I could trim the pieces to the proper angles before sewing. I love technology sometimes. In a few minutes, I had the templates taped to my ruler and made one of the rectangles into a triangle and sliced a complementary space out of the piece it was to be sewn to and held my breath as I ran them through the machine and opened the seam. Yay! It worked; I wasn’t going to have to tear my hair out after all
When I put all the blocks up on the felt wall, I was a little dismayed to see that the purple stars disappeared into the background. Hmm, maybe skipping my usual step of working out the entire layout before sewing wasn’t such a good idea. I thought about looking for other purples and redoing those blocks, but decided leaving them as is will give Amy and Blake an opportunity to teach Delphine about value and contrast as well as hue. In my original vision, the sashing intersections had a smaller version of the same star as the blocks. I did exactly one long star point in the sashing before I decided to simplify, because while I could use the same technique for trimming with templates as I had on the blocks, the pieces were smaller and harder to work with, and I was getting frustrated again. The sashing stars would just have to have four points a piece instead of eight. Again, I justified this as educational; Delphine can work on her pattern recognition skills by trying to find the shape of the sashing stars within the block stars.
When I got to the quilting, I started by stitching in the ditch with smoke monofilament along the sashing lines to secure the grid. For the blocks, my first thought was to do spirals in rayon thread to match each of the star colors. I did some warm up spirals on a scrap sandwich and they went okay, but when I got to the real thing, I had all sorts of trouble. The thread kept breaking even though I was using a special needle; I wasn’t happy with how lopsided the spiral was; I hadn’t thought out what would happen in the corners. To preserve my sanity, I switched to a straight line design that was easier. I still got to use the pretty rayon. I didn’t mark the design, so the blocks don’t quite match each other and some of the lines are a little skewed, but I’m okay with that. Imperfection shows the human touch. I finished the quilting by stippling in the background of the blocks with variegated cotton thread. (Detail photo here.) I really pushed the boundaries of acceptable imperfection with the stippling. Some of it is fine, with nicely flowing organic shapes, but some of it looks like the illustration for a story titled “Tragedy Strikes the Coral Reef”. If I’d had more time, I probably would have picked out and redone more of it, or at least gone back and camouflaged some of the skipped stitches, but I needed to move on to the binding.
I had to break my no sewing after 9 o’clock rule more than once in the days before my departure for Toronto. As a result, I sewed one of the binding strips on the wrong way round. I almost left it, but I really didn’t want to give up the look I’d planned, with yellow binding in the corner by the blue star and vice versa, so I spent a little more time with the seam ripper and fixed it. I used separate strips rather than a continuous one so I’d have more control over where the different colors ended up and tried a new to me technique for finishing the corners. The article said it would allow me to make neat mitered corners, but unfortunately I got to that step rather late at night and struggled a bit, but eventually figured out how to adapt the directions to reality. The final touch was the label. For the first time, I did it on the computer, similar to how I’d done the block centers for Ellie’s friendship quilt. Even though I used a new type of printer fabric (Printed Treasures, which I saw demonstrated at the quilt show in Chicago and bought on the spot) that’s less stiff, appliquéing it on was a bit difficult. Next time I do a label with this stuff, I’ll sew a border of regular fabric around it by machine to make it easier to attach.
I put the last stitches in late Friday night and took pictures and notes about the fabrics and threads used because someday I’m going to make a scrapbook documenting all the quilts I’ve made. Overall, I’m happy with how it turned out. This may be the first quilt I’ve ever done that has no points cut off. Sure, a couple of them are close, but none of them are blunted. When it came time to wrap it, I was fortunate to find a gift bag with the paper and ribbons downstairs because the Hallmark store had long since closed. I wasn’t sure if they’d want to inspect gifts at the border, so a bag was perfect. Now, seriously, I’m going to start on the memory quilt.
One year ago, I called up my earliest memory.