Red Scarf Four
January 12, 2007
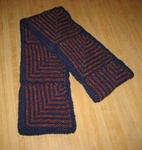
 I did it. I mastered the pattern that was giving me trouble when I wrote about my third red scarf. Okay, “mastered” is an overstatement, but I did figure it out enough to finish a scarf that looks decent and bears some resemblance to the picture in the book. The book is Modular Knits by Iris Schreier, and the project is the Building Blocks Shawl, which I made half of. Half a shawl equals a scarf, I figure; since it’s called the Red Scarf Project, not the Red Shawl Project, that seems just right.
The variegated red yarn (known as color B while I was working on this) is the one that was calling to me from my stash. It’s the Filtes-King Stampato Extra in shade #8008 I swatched back in April. It was supposed to be mittens someday, after I learned to knit well enough to make mittens, but it decided not to wait. The blue (color A, of course) is KnitPicks Swish in Dark Navy. I used a little less than 200 yards of each, I’d guess. (Well, definitely less than 200 of the red, since I started with only 190 yards of it in the first place, less what I’d already used for the swatch. The blue I’m less sure of, because I started with the leftovers from Red Scarf One and don’t know how much that was. I do know that I ran out of navy on the last square and had to order more and thank goodness the dye lot was close so I don’t think it’s obvious. If I were to do this again, I’d start with 300 yards of color A just to be safe.) I used size 9 US needles, which are bigger than the pattern calls for, because I wanted a wider scarf. It ended up about 5-1/2 inches wide by 60 inches long.
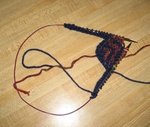
 This pattern was a challenge for me because there’s a lot going on: two yarns, three markers being placed and/or removed every row, increases and decreases, short rows, and carrying the unused yarn on the wrong side when I wasn’t entirely clear on which was the wrong side even though the rows in the pattern are marked RS/WS. I did a lot of ripping, which was a challenge in itself because of the short rows and the markers—where does the row end? where do I put the markers back in? But I struggled along because I liked how it was looking—and also I didn’t want to let the pattern beat me. (Eventually I made myself a spreadsheet showing row by row exactly how many stitches of which yarn I should have on each needle and where the markers should be. This was very handy when it came time to go back and fix mistakes—I didn’t have to rip the whole square and start over like I had the first few times.)
 I got really stumped near the end of the first square. After each row up to that point, there were always 40 stitches total on the needles—some worked, some not, but always 40 (unless I’d screwed up somewhere, which I did, thus the ripping). Fine. Then this row near the end comes along which has an increase but not a decrease. Okay, that makes 41 stitches. Dandy. Except the directions for the row after that say to bind off 20 stitches leaving 20 on the needles. What? 41 minus 20 does not equal 20. It just does not. I re-read the directions and re-checked my math and remained mystified. I decided to get rid of the extra stitch by doing a decrease at the end of the second to last row. It wasn’t until I’d gotten well along with the second square that I realized that solution wasn’t going to work. I knew early on that the join at one side didn’t look good, but I figured I could stitch that up during finishing. What I couldn’t live with was how the stripes in the two squares didn’t even remotely line up with each other, which became more and more evident the farther along I got with the second square. So I ripped and ripped and then tried a different solution to the extra stitch (decreasing at the end of the last row and then picking up a stitch from the square below and knitting two together to start the bind off row. That worked better, though it still didn’t seem ideal.
Only after I’d gotten two squares done did I check online for pattern corrections. (I know; lesson learned.) There are some, but they didn’t help me, as my edition of the book already has them incorporated. (Oddly, the pre-change version recognized that there were 21 stitches left). I signed up for the multidirectional knitting Yahoo! group I’d found when looking for pattern help—Iris Shreier posts there sometimes. I searched their archives and found this very question was discussed last January but never resolved. Looking at the group photos and searching Google, it doesn’t appear anyone has actually finished one of these scarf/shawls. Some people say theirs are “on the needles” but I’ve yet to find any evidence that they ever got off the needles.
About the same time as I joined the Yahoo! group, I posted my stitch count question on the Knitty boards and the first two people to respond told me my math was wrong. I felt really dense then but instead of crawling into a hole, I explained it again and someone agreed that yes, it did seem off. Then I asked in the Yahoo! group and the one person who had done this project (but not quite finished it) said she thought she’d done a decrease in that row and someone else looked into it and supported the idea that there was a problem there. Yay—I’m not an idiot (about this anyway). I’d still like to know what the correct answer is, since I’m pretty sure there’s a better way to do it than what I figured out.
 When I’d finished all the squares, I still wasn’t done, because this scarf pretty much demanded a crochet edging to even it up. I studied the pictures of the shawl in the book pretty carefully, and it appears that it has a crochet border. The supply list for the pattern includes a 10mm crochet hook but the directions never call for anything to be done with it. 10mm seems awfully large for a project done on knitting needles about half that diameter but what do I know about crochet. Not much–I had to look in Vogue Knitting to re-learn how to do it so I could add the border and neaten up the edges. I used a size H/5mm hook and did mostly single crochet with a few doubles thrown in where there was a little valley between squares.
In other knitting news, my Weasley sweater is making its public debut today (as opposed to its internet debut, which I guess was public, but you know what I mean. I solved the problem of the too big cuffs with rubber bands. Not that elegant, but it works.
